# Podcasts now in Razor SSG
Source: https://razor-ssg.web-templates.io/posts/razor-ssg-podcasts
## Razor SSG now supports Podcasts!
[Razor SSG](https://razor-ssg.web-templates.io) is our FREE Project Template for creating fast, statically generated Websites and Blogs with
Markdown & C# Razor Pages. A benefit of using Razor SSG to maintain our
[github.com/ServiceStack/servicestack.net](https://github.com/ServiceStack/servicestack.net) website is that
any improvements added to **servicestack.net** end up being rolled into the Razor SSG Project Template
for everyone else to enjoy.
The latest feature recently added is [ServiceStack Podcasts](https://servicestack.net/podcasts), providing an easy alternative to
learning about new features in our [TL;DR Release Notes](https://docs.servicestack.net/releases/v8_04) during a commute as well as a
fun and more informative experience whilst reading [blog posts](https://servicestack.net/blog).
The same podcast feature has now been rolled into the Razor SSG template allowing anyone to add the same
feature to their Razor SSG Websites which can be developed and hosted for FREE on GitHub Pages CDN:
### Create a new Razor SSG Project
Razor SSG
### Markdown Powered
The Podcast feature is very similar to the Markdown Blog Posts where each podcast is a simple
`.md` Markdown page seperated by a publish date and its unique slug, e.g:
**[/_podcasts](https://github.com/NetCoreTemplates/razor-ssg/tree/main/MyApp/_podcasts)**
```files
/_pages
/_podcasts
config.json
2024-10-02_razor-ssg-podcasts.md
2024-09-19_scalable-sqlite.md
2024-09-17_sqlite-request-logs.md
...
/_posts
/_videos
/_whatsnew
```
All editable content within different Podcast pages like the Podcast Sidebar is customizable within
[_podcasts/config.json](https://github.com/NetCoreTemplates/razor-ssg/blob/main/MyApp/_podcasts/config.json).
[](https://razor-ssg.web-templates.io/podcasts)
### Podcast Page
Whilst all content about a podcast is contained within its `.md` file and frontmatter which just like
Blog Posts can contain interactive Vue Components and custom [Markdown Containers](https://razor-press.web-templates.io/containers).
The [Backgrounds Jobs Podcast Page](https://razor-ssg.web-templates.io/podcasts/background-jobs) is a
good example of this where its [2024-09-12_background-jobs.md](https://github.com/NetCoreTemplates/razor-ssg/blob/main/MyApp/_podcasts/2024-09-12_background-jobs.md?plain=1)
contains both a `` Vue Component as well as `sh` and `youtube` custom markdown
containers to render its page:
[](https://razor-ssg.web-templates.io/podcasts/background-jobs)
### Audio Player
Podcasts are played using the [AudioPlayer.mjs](https://github.com/NetCoreTemplates/razor-ssg/blob/main/MyApp/wwwroot/pages/podcasts/AudioPlayer.mjs)
Vue Component that's enabled on each podcast page which will appear at the bottom of the page when played:
[](https://razor-ssg.web-templates.io/podcasts)
The `AudioPlayer` component is also independently usable as a standard Vue Component in
markdown content like [this .md page](https://github.com/NetCoreTemplates/razor-ssg/blob/main/MyApp/_posts/2024-10-02_razor-ssg-podcasts.md?plain=1#L72):
```html
```
:::{.py-8 .mx-auto .w-2/3 .not-prose}
:::
It can also be embeddable inside Razor `.cshtml` pages using
[Declarative Vue Components](https://servicestack.net/posts/net8-best-blazor#declarative-vue-components), e.g:
```html
@{
var episode = Podcasts.GetEpisodes().FirstOrDefault(x => x.Slug == doc.Slug);
}
```
### Dark Mode
As Razor SSG is built with Tailwind CSS, Dark Mode is also easily supported:
[](https://razor-ssg.web-templates.io/podcasts/background-jobs)
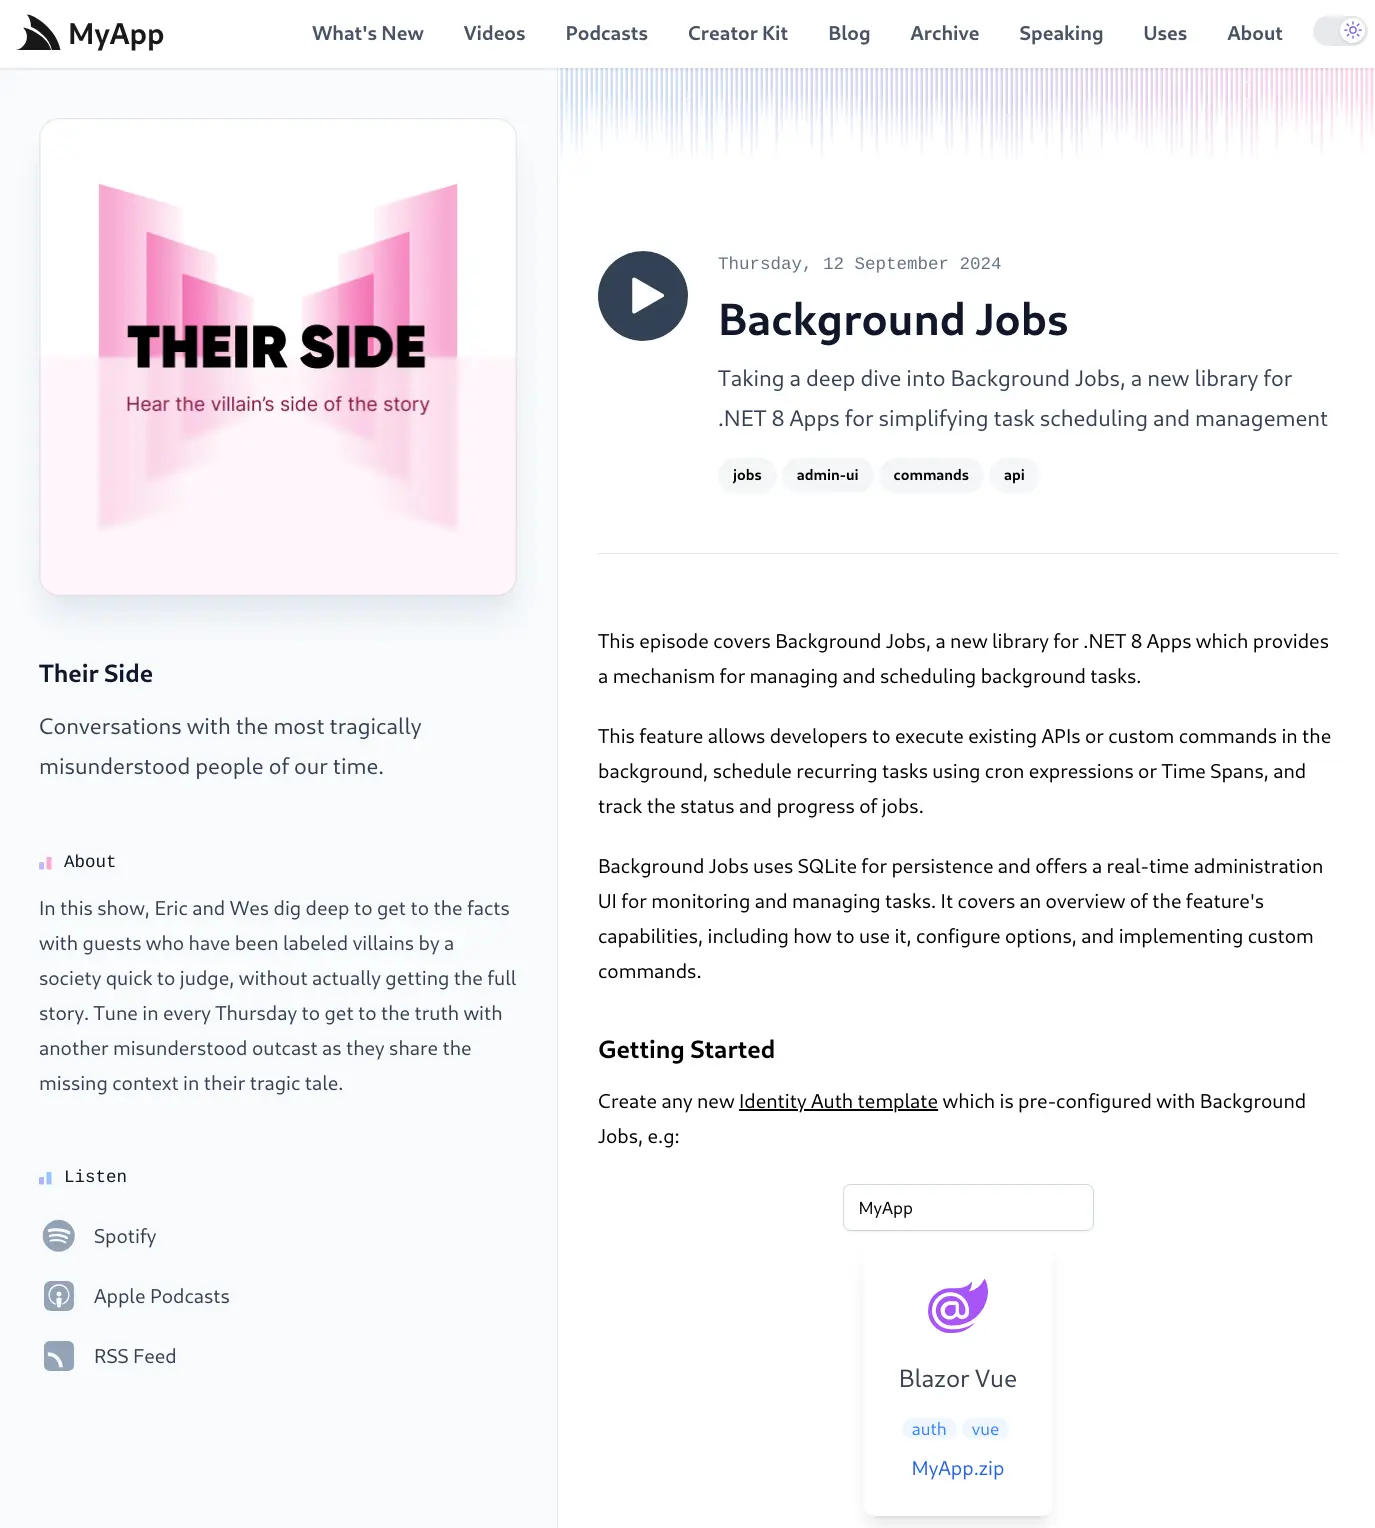
### Browse by Tags
Just like [blog post archives](https://razor-ssg.web-templates.io/posts/), the frontmatter collection of `tags` is used to generate related podcast pages,
aiding discoverability by grouping related podcasts by **tag** at the following route:
/podcasts/tagged/{tag}
https://razor-ssg.web-templates.io/podcasts/tagged/release
[](https://razor-ssg.web-templates.io/podcasts/tagged/release)
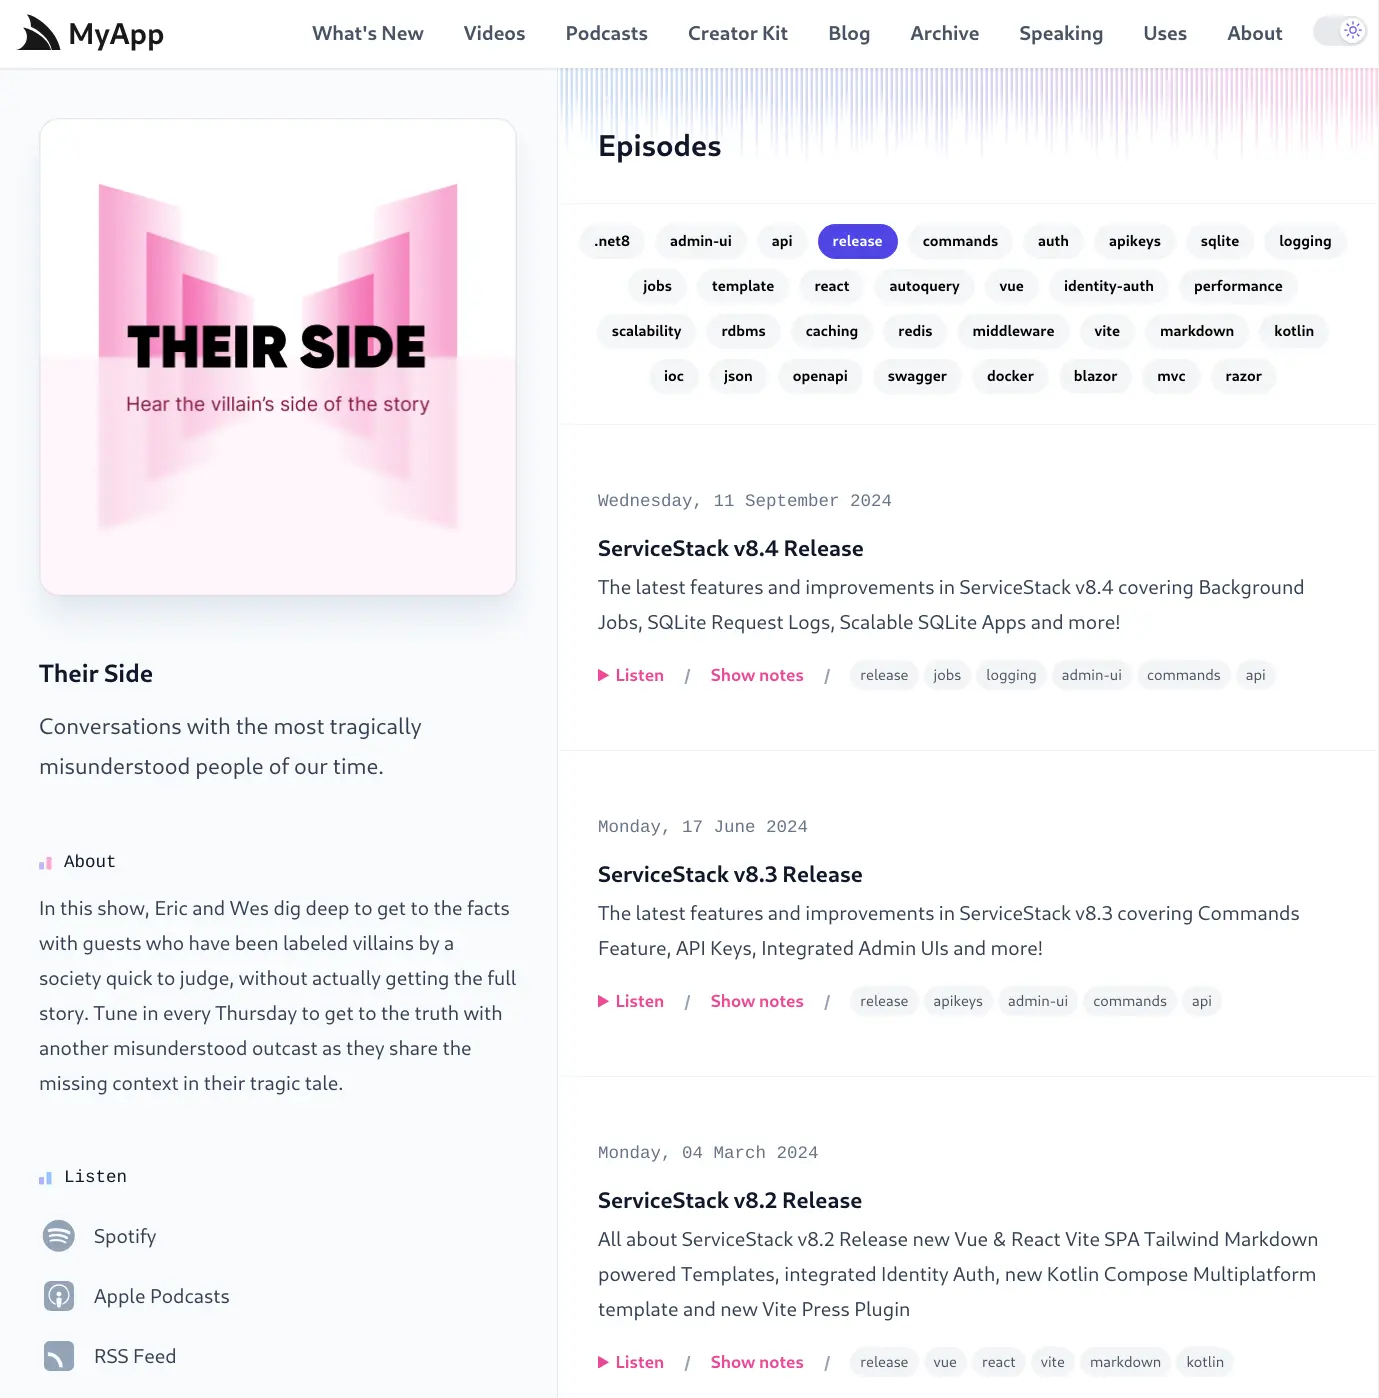
### Browse by Year
Likewise podcast archives are also browsable by the year their published at the route:
/podcasts/year/{year}
https://razor-ssg.web-templates.io/podcasts/year/2024
[](https://razor-ssg.web-templates.io/podcasts/year/2024)
### iTunes-compatible Podcast RSS Feed
The information in [config.json](https://github.com/NetCoreTemplates/razor-ssg/blob/main/MyApp/_podcasts/config.json)
is also used in the generated podcast RSS feed at:
[/podcasts/feed.xml](https://razor-ssg.web-templates.io/podcasts/feed.xml)
Which is a popular format podcast Applications can use to get notified when new Podcast
episodes are available. The RSS Feed is also compatible with [podcasters.apple.com](https://podcasters.apple.com)
and can be used to publish your podcast to [Apple Podcasts](https://podcasts.apple.com).
```xml
Their Side
https://razor-ssg.web-templates.io/podcasts
https://razor-ssg.web-templates.io/img/posts/cover.pngTheir Side
/podcasts
razor-ssgRazor SSGWed, 02 Oct 2024 03:54:03 GMTemail@example.org (Razor SSG)email@example.org (Razor SSG)Razor SSGRazor SSGemail@example.org
...
```
# ASP.NET Core JWT Identity Auth
Source: https://razor-ssg.web-templates.io/posts/jwt-identity-auth
JWTs enable stateless authentication of clients without servers needing to maintain any Auth state in server infrastructure
or perform any I/O to validate a token. As such,
[JWTs are a popular choice for Microservices](https://docs.servicestack.net/auth/jwt-authprovider#stateless-auth-microservices)
as they only need to configured with confidential keys to validate access.
### ASP.NET Core JWT Authentication
ServiceStack's JWT Identity Auth reimplements many of the existing [ServiceStack JWT AuthProvider](https://docs.servicestack.net/auth/jwt-authprovider)
features but instead of its own implementation, integrates with and utilizes ASP.NET Core's built-in JWT Authentication that's
configurable in .NET Apps with the `.AddJwtBearer()` extension method, e.g:
#### Program.cs
```csharp
services.AddAuthentication()
.AddJwtBearer(options => {
options.TokenValidationParameters = new()
{
ValidIssuer = config["JwtBearer:ValidIssuer"],
ValidAudience = config["JwtBearer:ValidAudience"],
IssuerSigningKey = new SymmetricSecurityKey(
Encoding.UTF8.GetBytes(config["JwtBearer:IssuerSigningKey"]!)),
ValidateIssuerSigningKey = true,
};
})
.AddIdentityCookies(options => options.DisableRedirectsForApis());
```
Then use the `JwtAuth()` method to enable and configure ServiceStack's support for ASP.NET Core JWT Identity Auth:
#### Configure.Auth.cs
```csharp
public class ConfigureAuth : IHostingStartup
{
public void Configure(IWebHostBuilder builder) => builder
.ConfigureServices(services => {
services.AddPlugin(new AuthFeature(IdentityAuth.For(
options => {
options.SessionFactory = () => new CustomUserSession();
options.CredentialsAuth();
options.JwtAuth(x => {
// Enable JWT Auth Features...
});
})));
});
}
```
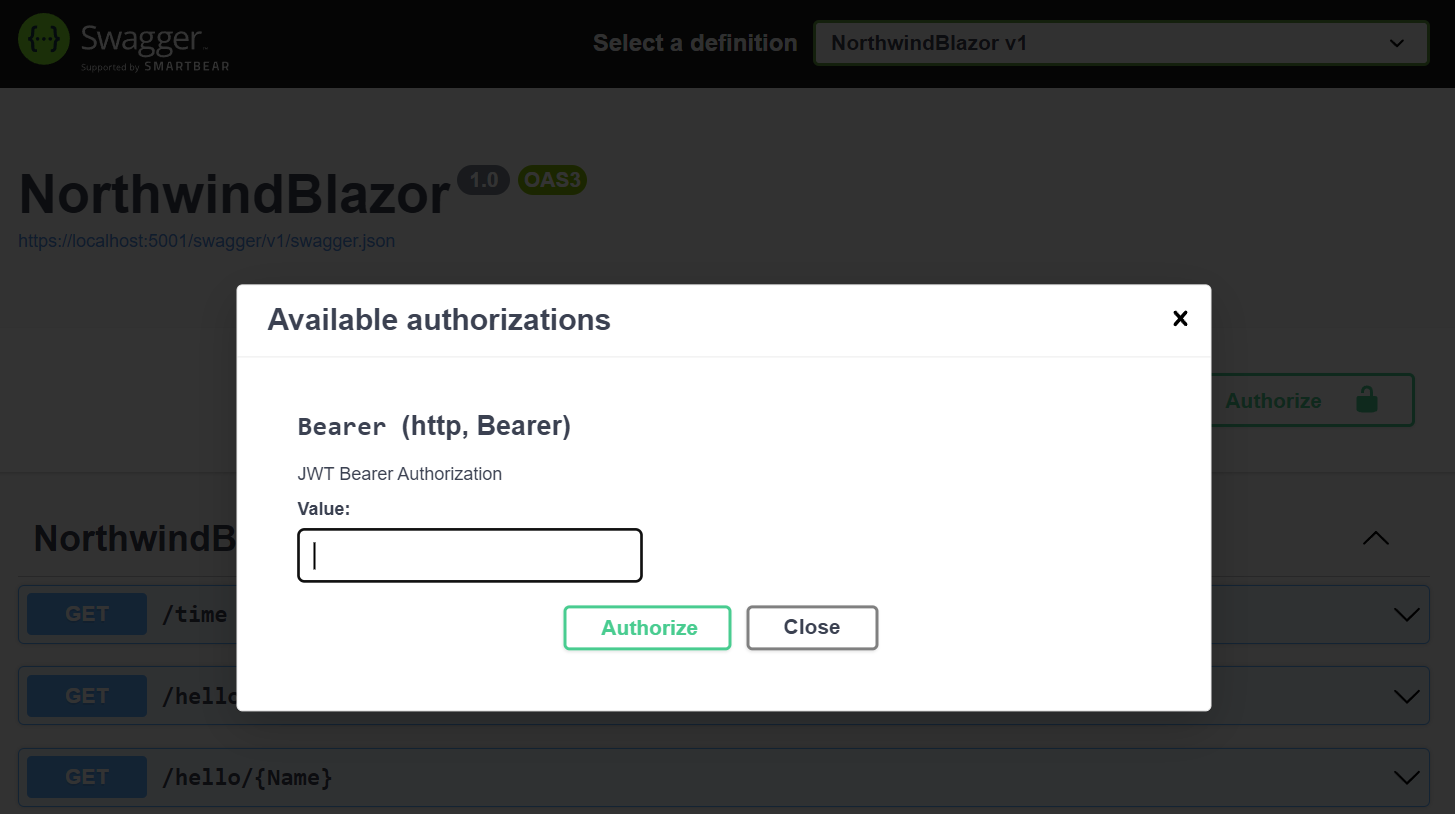
### Enable in Swagger UI
Once configured we can enable JWT Auth in Swagger UI by installing **Swashbuckle.AspNetCore**:
:::copy
``
:::
Then enable Open API, Swagger UI, ServiceStack's support for Swagger UI and the JWT Bearer Auth option:
```csharp
public class ConfigureOpenApi : IHostingStartup
{
public void Configure(IWebHostBuilder builder) => builder
.ConfigureServices((context, services) => {
if (context.HostingEnvironment.IsDevelopment())
{
services.AddEndpointsApiExplorer();
services.AddSwaggerGen();
services.AddServiceStackSwagger();
services.AddJwtAuth();
//services.AddBasicAuth();
services.AddTransient();
}
});
public class StartupFilter : IStartupFilter
{
public Action Configure(Action next)
=> app => {
// Provided by Swashbuckle library
app.UseSwagger();
app.UseSwaggerUI();
next(app);
};
}
}
```
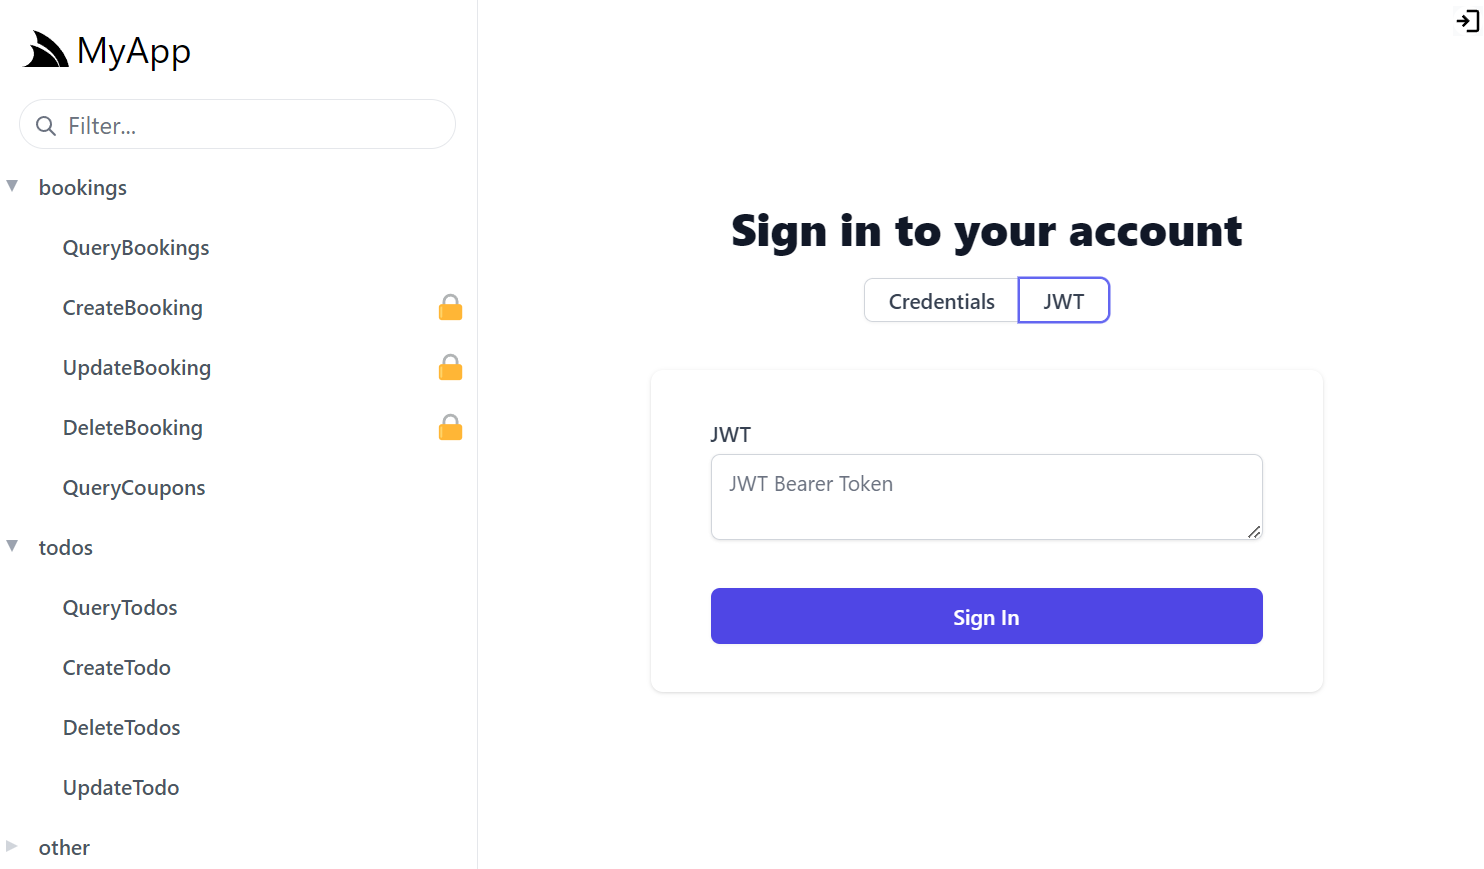
This will enable the **Authorize** button in Swagger UI where you can authenticate with a JWT Token:
### JWT Auth in Built-in UIs
This also enables the **JWT** Auth Option in ServiceStack's built-in
[API Explorer](https://docs.servicestack.net/api-explorer),
[Locode](https://docs.servicestack.net/locode/) and
[Admin UIs](https://docs.servicestack.net/admin-ui):
### Authenticating with JWT
JWT Identity Auth is a drop-in replacement for ServiceStack's JWT AuthProvider where Authenticating via Credentials
will convert the Authenticated User into a JWT Bearer Token returned in the **HttpOnly**, **Secure** `ss-tok` Cookie
that will be used to Authenticate the client:
```csharp
var client = new JsonApiClient(BaseUrl);
await client.SendAsync(new Authenticate {
provider = "credentials",
UserName = Username,
Password = Password,
});
var bearerToken = client.GetTokenCookie(); // ss-tok Cookie
```
## JWT Refresh Tokens
Refresh Tokens can be used to allow users to request a new JWT Access Token when the current one expires.
To enable support for JWT Refresh Tokens your `IdentityUser` model should implement the `IRequireRefreshToken` interface
which will be used to store the 64 byte Base64 URL-safe `RefreshToken` and its `RefreshTokenExpiry` in its persisted properties:
```csharp
public class ApplicationUser : IdentityUser, IRequireRefreshToken
{
public string? RefreshToken { get; set; }
public DateTime? RefreshTokenExpiry { get; set; }
}
```
Now after successful authentication, the `RefreshToken` will also be returned in the `ss-reftok` Cookie:
```csharp
var refreshToken = client.GetRefreshTokenCookie(); // ss-reftok Cookie
```
### Transparent Server Auto Refresh of JWT Tokens
To be able to terminate a users access, Users need to revalidate their eligibility to verify they're still allowed access
(e.g. deny Locked out users). This JWT revalidation pattern is implemented using Refresh Tokens which are used to request
revalidation of their access and reissuing a new JWT Access Token which can be used to make authenticated requests until it expires.
As Cookies are used to return Bearer and Refresh Tokens ServiceStack is able to implement the revalidation logic on the
server where it transparently validates Refresh Tokens, and if a User is eligible will reissue a new JWT Token Cookie that
replaces the expired Access Token Cookie.
Thanks to this behavior HTTP Clients will be able to Authenticate with just the Refresh Token, which will transparently
reissue a new JWT Access Token Cookie and then continue to perform the Authenticated Request:
```csharp
var client = new JsonApiClient(BaseUrl);
client.SetRefreshTokenCookie(RefreshToken);
var response = await client.SendAsync(new Secured { ... });
```
There's also opt-in sliding support for extending a User's RefreshToken after usage which allows Users to treat
their Refresh Token like an API Key where it will continue extending whilst they're continuously using it to make API requests,
otherwise expires if they stop. How long to extend the expiry of Refresh Tokens after usage can be configured with:
```csharp
options.JwtAuth(x => {
// How long to extend the expiry of Refresh Tokens after usage (default None)
x.ExtendRefreshTokenExpiryAfterUsage = TimeSpan.FromDays(90);
});
```
## Convert Session to Token Service
Another useful Service that's available is being able to Convert your current Authenticated Session into a Token
with the `ConvertSessionToToken` Service which can be enabled with:
```csharp
options.JwtAuth(x => {
x.IncludeConvertSessionToTokenService = true;
});
```
This can be useful for when you want to Authenticate via an external OAuth Provider that you then want to convert into a stateless
JWT Token by calling the `ConvertSessionToToken` on the client, e.g:
#### .NET Clients
```csharp
await client.SendAsync(new ConvertSessionToToken());
```
#### TypeScript/JavaScript
```ts
fetch('/session-to-token', { method:'POST', credentials:'include' })
```
The default behavior of `ConvertSessionToToken` is to remove the Current Session from the Auth Server which will prevent
access to protected Services using our previously Authenticated Session. If you still want to preserve your existing Session
you can indicate this with:
```csharp
await client.SendAsync(new ConvertSessionToToken {
PreserveSession = true
});
```
### JWT Options
Other configuration options available for Identity JWT Auth include:
```csharp
options.JwtAuth(x => {
// How long should JWT Tokens be valid for. (default 14 days)
x.ExpireTokensIn = TimeSpan.FromDays(14);
// How long should JWT Refresh Tokens be valid for. (default 90 days)
x.ExpireRefreshTokensIn = TimeSpan.FromDays(90);
x.OnTokenCreated = (req, user, claims) => {
// Customize which claims are included in the JWT Token
};
// Whether to invalidate Refresh Tokens on Logout (default true)
x.InvalidateRefreshTokenOnLogout = true;
// How long to extend the expiry of Refresh Tokens after usage (default None)
x.ExtendRefreshTokenExpiryAfterUsage = null;
});
```
# Built-In Identity Auth Admin UI
Source: https://razor-ssg.web-templates.io/posts/identity-auth-admin-ui
With ServiceStack now [deeply integrated into ASP.NET Core Apps](/posts/servicestack-endpoint-routing) we're back to
refocusing on adding value-added features that can benefit all .NET Core Apps.
## Registration
The new Identity Auth Admin UI is an example of this, which can be enabled when registering the `AuthFeature` Plugin:
```csharp
public class ConfigureAuth : IHostingStartup
{
public void Configure(IWebHostBuilder builder) => builder
.ConfigureServices(services => {
services.AddPlugin(new AuthFeature(IdentityAuth.For(
options => {
options.SessionFactory = () => new CustomUserSession();
options.CredentialsAuth();
options.AdminUsersFeature();
})));
});
}
```
Which just like the ServiceStack Auth [Admin Users UI](https://docs.servicestack.net/admin-ui-users) enables a
Admin UI that's only accessible to **Admin** Users for managing **Identity Auth** users at `/admin-ui/users`.
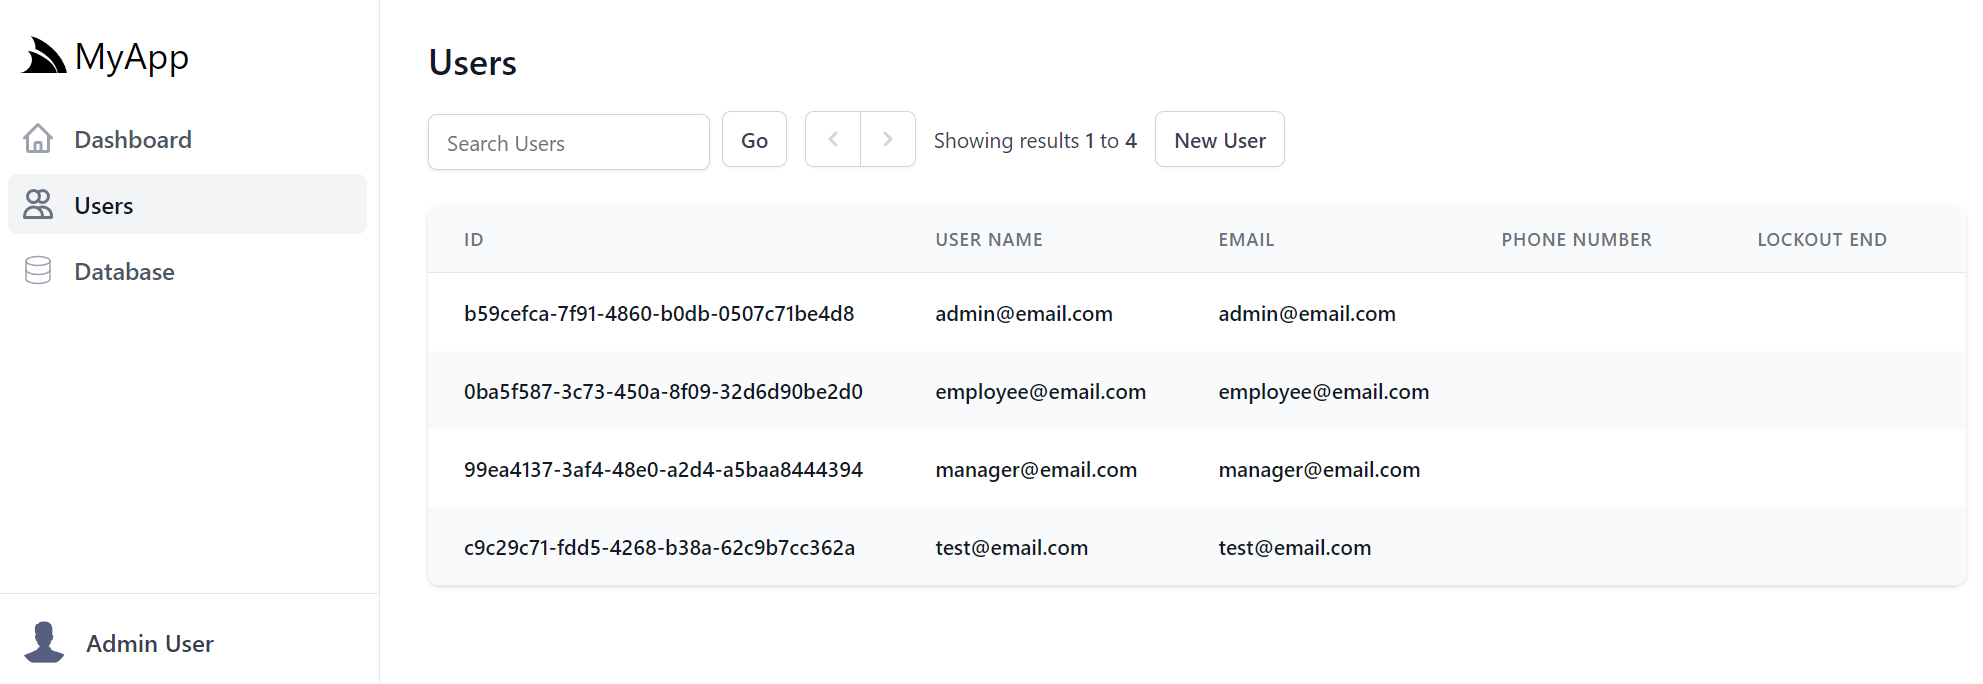
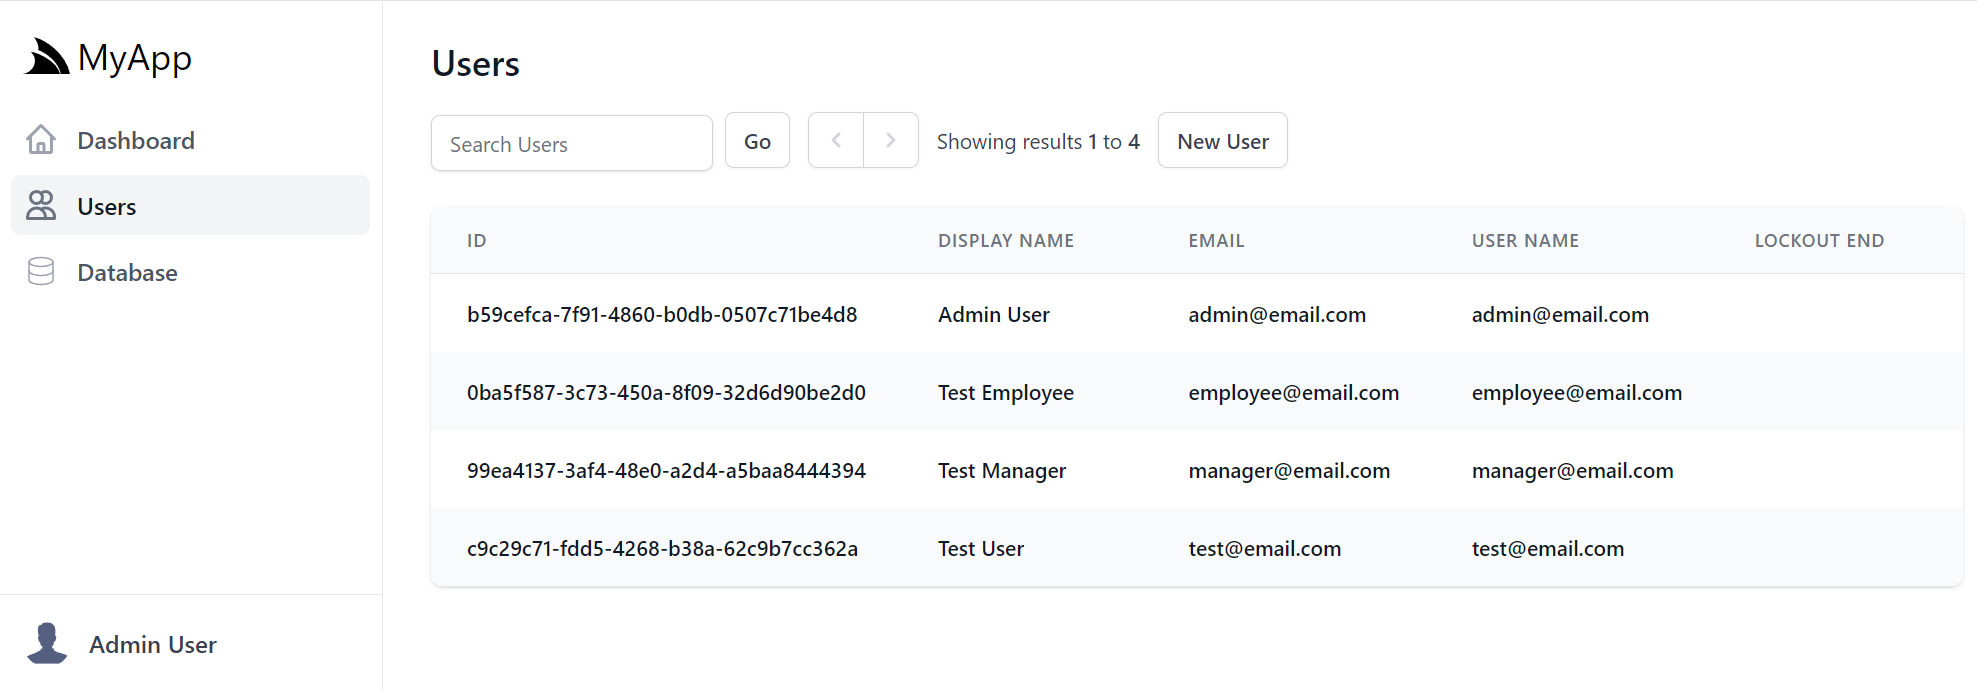
## User Search Results
Which displays a limited view due to the minimal properties on the default `IdentityAuth` model:
### Custom Search Result Properties
These User's search results are customizable by specifying the `ApplicationUser` properties to display instead, e.g:
```csharp
options.AdminUsersFeature(feature =>
{
feature.QueryIdentityUserProperties =
[
nameof(ApplicationUser.Id),
nameof(ApplicationUser.DisplayName),
nameof(ApplicationUser.Email),
nameof(ApplicationUser.UserName),
nameof(ApplicationUser.LockoutEnd),
];
});
```
### Custom Search Result Behavior
The default display Order of Users is also customizable:
```csharp
feature.DefaultOrderBy = nameof(ApplicationUser.DisplayName);
```
As well as the Search behavior which can be replaced to search any custom fields, e.g:
```csharp
feature.SearchUsersFilter = (q, query) =>
{
var queryUpper = query.ToUpper();
return q.Where(x =>
x.DisplayName!.Contains(query) ||
x.Id.Contains(queryUpper) ||
x.NormalizedUserName!.Contains(queryUpper) ||
x.NormalizedEmail!.Contains(queryUpper));
};
```
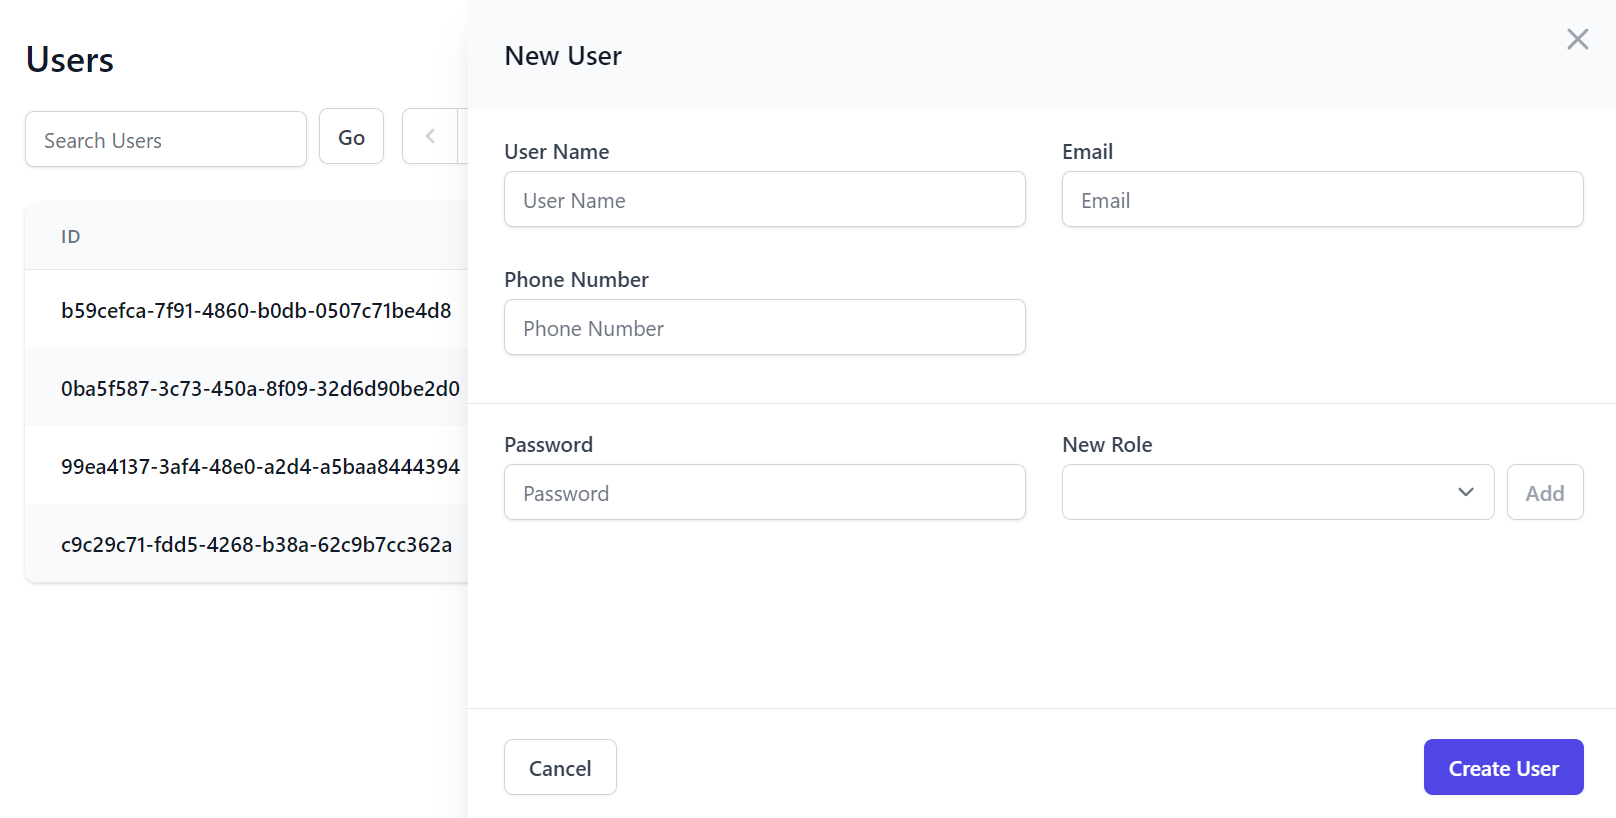
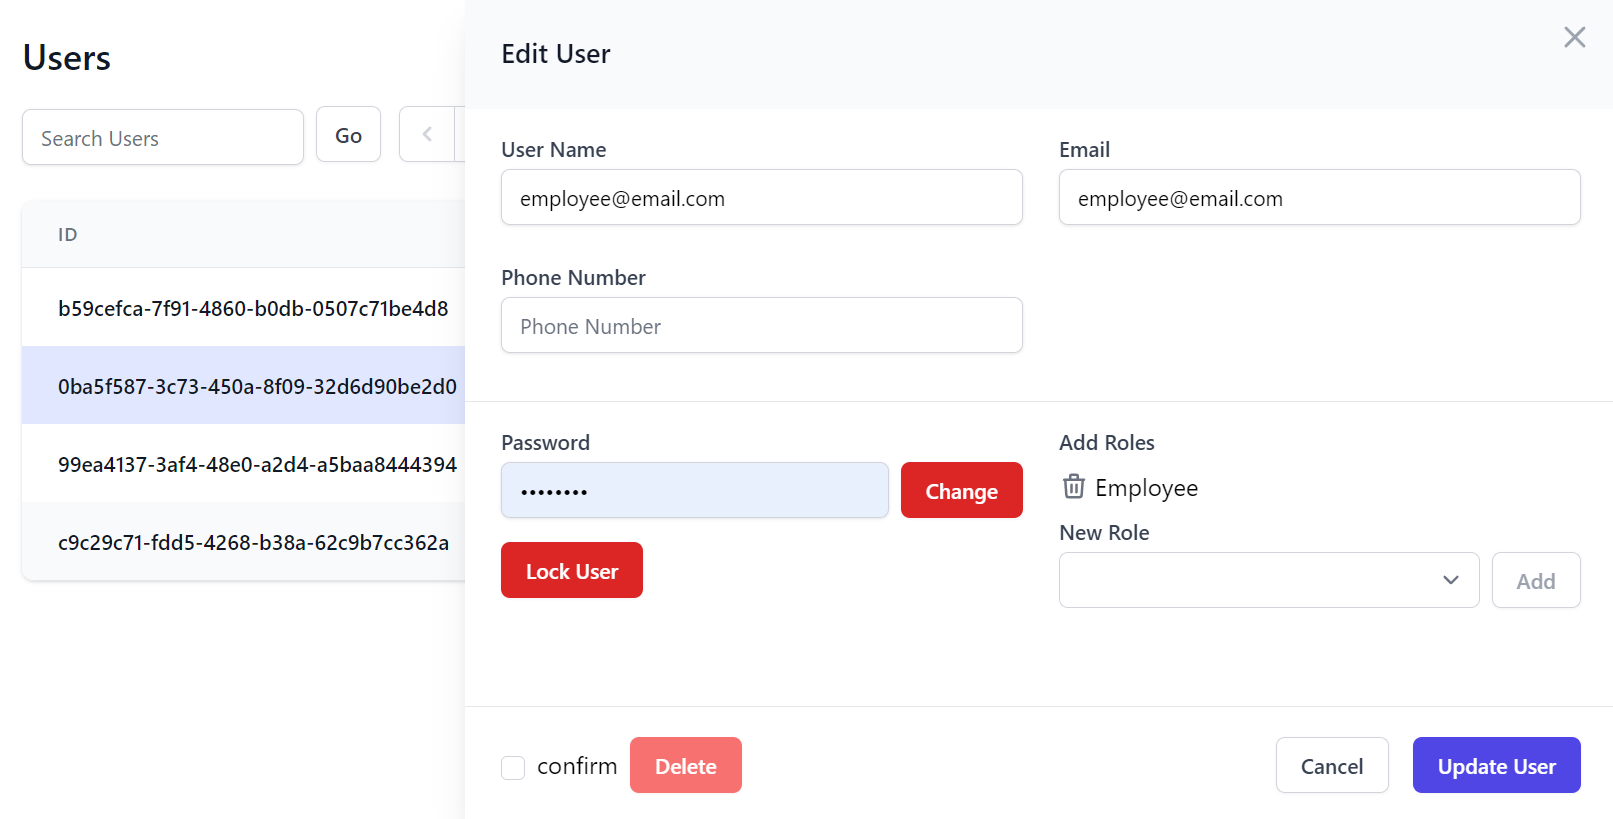
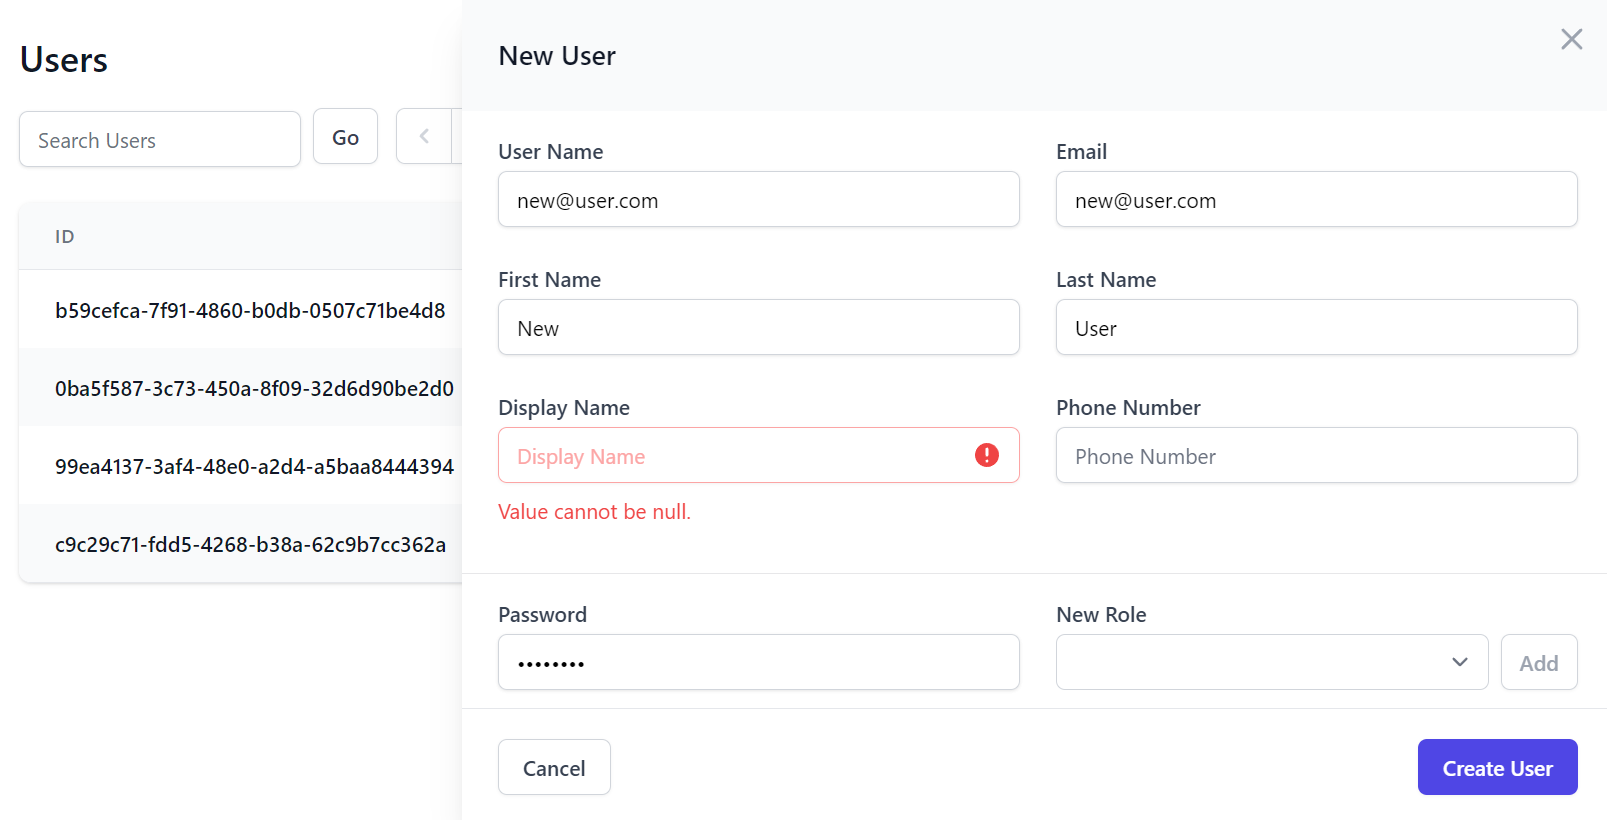
## Default Create and Edit Users Forms
The default Create and Edit Admin Users UI are also limited to editing the minimal `IdentityAuth` properties:
Whilst the Edit page includes standard features to lockout users, change user passwords and manage their roles:
### Custom Create and Edit Forms
By default Users are locked out indefinitely, but this can also be changed to lock users out to a specific date, e.g:
```csharp
feature.ResolveLockoutDate = user => DateTimeOffset.Now.AddDays(7);
```
The forms editable fields can also be customized to include additional properties, e.g:
```csharp
feature.FormLayout =
[
Input.For(x => x.UserName, c => c.FieldsPerRow(2)),
Input.For(x => x.Email, c => {
c.Type = Input.Types.Email;
c.FieldsPerRow(2);
}),
Input.For(x => x.FirstName, c => c.FieldsPerRow(2)),
Input.For(x => x.LastName, c => c.FieldsPerRow(2)),
Input.For(x => x.DisplayName, c => c.FieldsPerRow(2)),
Input.For(x => x.PhoneNumber, c =>
{
c.Type = Input.Types.Tel;
c.FieldsPerRow(2);
}),
];
```
That can override the new `ApplicationUser` Model that's created and any Validation:
### Custom User Creation
```csharp
feature.CreateUser = () => new ApplicationUser { EmailConfirmed = true };
feature.CreateUserValidation = async (req, createUser) =>
{
await IdentityAdminUsers.ValidateCreateUserAsync(req, createUser);
var displayName = createUser.GetUserProperty(nameof(ApplicationUser.DisplayName));
if (string.IsNullOrEmpty(displayName))
throw new ArgumentNullException(nameof(AdminUserBase.DisplayName));
return null;
};
```
### Admin User Events
Should you need to, Admin User Events can use used to execute custom logic before and after creating, updating and
deleting users, e.g:
```csharp
feature.OnBeforeCreateUser = (request, user) => { ... };
feature.OnAfterCreateUser = (request, user) => { ... };
feature.OnBeforeUpdateUser = (request, user) => { ... };
feature.OnAfterUpdateUser = (request, user) => { ... };
feature.OnBeforeDeleteUser = (request, userId) => { ... };
feature.OnAfterDeleteUser = (request, userId) => { ... };
```
# System.Text.Json ServiceStack APIs
Source: https://razor-ssg.web-templates.io/posts/system-text-json-apis
In continuing our focus to enable ServiceStack to become a deeply integrated part of .NET 8 Application's, ServiceStack
latest .NET 8 templates now default to using standardized ASP.NET Core features wherever possible, including:
- [ASP.NET Core Identity Auth](/posts/net8-identity-auth)
- [ASP.NET Core IOC](/posts/servicestack-endpoint-routing#asp.net-core-ioc)
- [Endpoint Routing](/posts/servicestack-endpoint-routing#endpoint-routing)
- [Swashbuckle for Open API v3 and Swagger UI](/posts/openapi-v3-support)
- [System.Text.Json APIs](/posts/system-text-json-apis)
This reduces friction for integrating ServiceStack into existing .NET 8 Apps, encourages greater knowledge and reuse and
simplifies .NET development as developers have a reduced number of concepts to learn, fewer technology implementations to
configure and maintain that are now applied across their entire .NET App.
The last integration piece supported was utilizing **System.Text.Json** - the default high-performance async JSON serializer
used in .NET Applications, can now be used by ServiceStack APIs to serialize and deserialize its JSON API Responses
that's enabled by default when using **Endpoint Routing**.
This integrates ServiceStack APIs more than ever where just like Minimal APIs and Web API,
uses **ASP.NET Core's IOC** to resolve dependencies, uses **Endpoint Routing** to Execute APIs that's secured with
**ASP.NET Core Identity Auth** then uses **System.Text.Json** to deserialize and serialize its JSON payloads.
### Enabled by Default when using Endpoint Routing
```csharp
app.UseServiceStack(new AppHost(), options => {
options.MapEndpoints();
});
```
### Enhanced Configuration
ServiceStack uses a custom `JsonSerializerOptions` to improve compatibility with existing ServiceStack DTOs and
ServiceStack's rich ecosystem of generic [Add ServiceStack Reference](https://docs.servicestack.net/add-servicestack-reference)
Service Clients, which is configured to:
- Not serialize `null` properties
- Supports Case Insensitive Properties
- Uses `CamelCaseNamingPolicy` for property names
- Serializes `TimeSpan` and `TimeOnly` Data Types with [XML Schema Time format](https://www.w3.org/TR/xmlschema-2/#isoformats)
- Supports `[DataContract]` annotations
- Supports Custom Enum Serialization
### Benefits all Add ServiceStack Reference Languages
This compatibility immediately benefits all of ServiceStack's [Add ServiceStack Reference](https://docs.servicestack.net/add-servicestack-reference)
native typed integrations for **11 programming languages** which all utilize ServiceStack's JSON API endpoints - now serialized with System.Text.Json
### Support for DataContract Annotations
Support for .NET's `DataContract` serialization attributes was added using a custom `TypeInfoResolver`, specifically it supports:
- `[DataContract]` - When annotated, only `[DataMember]` properties are serialized
- `[DataMember]` - Specify a custom **Name** or **Order** of properties
- `[IgnoreDataMember]` - Ignore properties from serialization
- `[EnumMember]` - Specify a custom value for Enum values
### Custom Enum Serialization
Below is a good demonstration of the custom Enum serialization support which matches ServiceStack.Text's behavior:
```csharp
public enum EnumType { Value1, Value2, Value3 }
[Flags]
public enum EnumTypeFlags { Value1, Value2, Value3 }
public enum EnumStyleMembers
{
[EnumMember(Value = "lower")]
Lower,
[EnumMember(Value = "UPPER")]
Upper,
}
return new EnumExamples {
EnumProp = EnumType.Value2, // String value by default
EnumFlags = EnumTypeFlags.Value2 | EnumTypeFlags.Value3, // [Flags] as int
EnumStyleMembers = EnumStyleMembers.Upper, // Serializes [EnumMember] value
NullableEnumProp = null, // Ignores nullable enums
};
```
Which serializes to:
```json
{
"enumProp": "Value2",
"enumFlags": 3,
"enumStyleMembers": "UPPER"
}
```
### Custom Configuration
You can further customize the `JsonSerializerOptions` used by ServiceStack by using `ConfigureJsonOptions()` to add
any customizations that you can optionally apply to ASP.NET Core's JSON APIs and MVC with:
```csharp
builder.Services.ConfigureJsonOptions(options => {
options.PropertyNamingPolicy = JsonNamingPolicy.SnakeCaseLower;
})
.ApplyToApiJsonOptions() // Apply to ASP.NET Core's JSON APIs
.ApplyToMvcJsonOptions(); // Apply to MVC
```
### Control over when and where System.Text.Json is used
Whilst `System.Text.Json` is highly efficient, it's also very strict in the inputs it accepts where you may want to
revert back to using ServiceStack's JSON Serializer for specific APIs, especially when you need to support external
clients that can't be updated.
This can done by annotating Request DTOs with `[SystemJson]` attribute, e.g: you can limit to only use `System.Text.Json`
for an **APIs Response** with:
```csharp
[SystemJson(UseSystemJson.Response)]
public class CreateUser : IReturn
{
//...
}
```
Or limit to only use `System.Text.Json` for an **APIs Request** with:
```csharp
[SystemJson(UseSystemJson.Request)]
public class CreateUser : IReturn
{
//...
}
```
Or not use `System.Text.Json` at all for an API with:
```csharp
[SystemJson(UseSystemJson.Never)]
public class CreateUser : IReturn
{
//...
}
```
### JsonApiClient Support
When Endpoints Routing is configured, the `JsonApiClient` will also be configured to utilize the same `System.Text.Json`
options to send and receive its JSON API Requests which also respects the `[SystemJson]` specified behavior.
Clients external to the .NET App can be configured to use `System.Text.Json` with:
```csharp
ClientConfig.UseSystemJson = UseSystemJson.Always;
```
Whilst any custom configuration can be applied to its `JsonSerializerOptions` with:
```csharp
TextConfig.ConfigureSystemJsonOptions(options => {
options.PropertyNamingPolicy = JsonNamingPolicy.SnakeCaseLower;
});
```
### Scoped JSON Configuration
We've also added partial support for [Customized JSON Responses](https://docs.servicestack.net/customize-json-responses)
for the following customization options:
:::{.table,w-full}
| Name | Alias |
|------------------------------|-------|
| EmitCamelCaseNames | eccn |
| EmitLowercaseUnderscoreNames | elun |
| EmitPascalCaseNames | epcn |
| ExcludeDefaultValues | edv |
| IncludeNullValues | inv |
| Indent | pp |
:::
These can be applied to the JSON Response by returning a decorated `HttpResult` with a custom `ResultScope`, e.g:
```csharp
return new HttpResult(responseDto) {
ResultScope = () =>
JsConfig.With(new() { IncludeNullValues = true, ExcludeDefaultValues = true })
};
```
They can also be requested by API consumers by adding a `?jsconfig` query string with the desired option or its alias, e.g:
```csharp
/api/MyRequest?jsconfig=EmitLowercaseUnderscoreNames,ExcludeDefaultValues
/api/MyRequest?jsconfig=eccn,edv
```
### SystemJsonCompatible
Another configuration automatically applied when `System.Text.Json` is enabled is:
```csharp
JsConfig.SystemJsonCompatible = true;
```
Which is being used to make ServiceStack's JSON Serializer more compatible with `System.Text.Json` output so it's easier
to switch between the two with minimal effort and incompatibility. Currently this is only used to override
`DateTime` and `DateTimeOffset` behavior which uses `System.Text.Json` for its Serialization/Deserialization.
# OpenAPI v3 and Swagger UI
Source: https://razor-ssg.web-templates.io/posts/openapi-v3
In the ServiceStack v8.1 release, we have introduced a way to better incorporate your ServiceStack APIs into the larger
ASP.NET Core ecosystem by mapping your ServiceStack APIs to standard [ASP.NET Core Endpoints](https://learn.microsoft.com/en-us/aspnet/core/fundamentals/routing?view=aspnetcore-8.0#endpoints).
This enables your ServiceStack APIs integrate with your larger ASP.NET Core application in the same way other
middleware does, opening up more opportunities for reuse of your ServiceStack APIs.
This opens up the ability to use common third party tooling. A good example of this is adding OpenAPI v3 specification
generation for your endpoints offered by the `Swashbuckle.AspNetCore` package.
:::youtube zAq9hp7ojn4
.NET 8 Open API v3 and Swagger UI
:::
Included in the v8.1 Release is the `ServiceStack.AspNetCore.OpenApi` package to make this integration
as easy as possible, and incorporate additional information from your ServiceStack APIs into Swagger metadata.

Previously, without the ability to map Endpoints, we've maintained a ServiceStack specific OpenAPI specification generation
via the `OpenApiFeature` plugin. While this provided a lot of functionality by accurately describing your ServiceStack APIs,
it could be tricky to customize those API descriptions to the way some users wanted to.
In this post we will look at how you can take advantage of the new OpenAPI v3 Swagger support using mapped Endpoints,
customizing the generated specification, as well as touch on other related changes to ServiceStack v8.1.
## AppHost Initialization
To use ServiceStack APIs as mapped Endpoints, the way ServiceStack is initialized in .
To convert your App to use [Endpoint Routing and ASP.NET Core IOC](/posts/servicestack-endpoint-routing) your ASPNET Core
application needs to be updated to replace any usage of `Funq` IoC container to use ASP.NET Core's IOC.
Previously, the following was used to initialize your ServiceStack `AppHost`:
#### Program.cs
```csharp
app.UseServiceStack(new AppHost());
```
The `app` in this example is a `WebApplication` resulting from an `IHostApplicationBuilder` calling `builder.Build()`.
Whilst we still need to call `app.UseServiceStack()`, we also need to move the discovery of your ServiceStack APIs to earlier
in the setup before the `WebApplication` is built, e.g:
```csharp
// Register ServiceStack APIs, Dependencies and Plugins:
services.AddServiceStack(typeof(MyServices).Assembly);
var app = builder.Build();
//...
// Register ServiceStack AppHost
app.UseServiceStack(new AppHost(), options => {
options.MapEndpoints();
});
app.Run();
```
Once configured to use Endpoint Routing we can the [mix](https://docs.servicestack.net/mix-tool) tool to apply the
[openapi3](https://gist.github.com/gistlyn/dac47b68e77796902cde0f0b7b9c6ac2) Startup Configuration with:
:::sh
x mix openapi3
:::
### Manually Configure OpenAPI v3 and Swagger UI
This will install the required ASP.NET Core Microsoft, Swashbuckle and ServiceStack Open API NuGet packages:
```xml
```
Then add the `Configure.OpenApi.cs` [Modular Startup](https://docs.servicestack.net/modular-startup) class to your project:
```csharp
[assembly: HostingStartup(typeof(MyApp.ConfigureOpenApi))]
namespace MyApp;
public class ConfigureOpenApi : IHostingStartup
{
public void Configure(IWebHostBuilder builder) => builder
.ConfigureServices((context, services) =>
{
if (context.HostingEnvironment.IsDevelopment())
{
services.AddEndpointsApiExplorer();
services.AddSwaggerGen(); // Swashbuckle
services.AddServiceStackSwagger();
services.AddBasicAuth(); // Enable HTTP Basic Auth
//services.AddJwtAuth(); // Enable & Use JWT Auth
services.AddTransient();
}
});
public class StartupFilter : IStartupFilter
{
public Action Configure(Action next)
=> app => {
// Provided by Swashbuckle library
app.UseSwagger();
app.UseSwaggerUI();
next(app);
};
}
}
```
All this setup is done for you in ServiceStack's updated [Identity Auth .NET 8 Templates](https://servicestack.net/start),
but for existing applications, you will need to do
[convert to use Endpoint Routing](https://docs.servicestack.net/endpoints-migration) to support this new way of running your
ServiceStack applications.
## More Control
One point of friction with our previous `OpenApiFeature` plugin was the missing customization ability to the OpenAPI spec to somewhat disconnect from the defined ServiceStack service, and related C# Request and Response Data Transfer Objects (DTOs). Since the `OpenApiFeature` plugin used class and property attributes on your Request DTOs, making the *structure* of the OpenAPI schema mapping quite ridged, preventing the ability for certain customizations.
For example, if we have an `UpdateTodo` Request DTO that looks like the following:
```csharp
[Route("/todos/{Id}", "PUT")]
public class UpdateTodo : IPut, IReturn
{
public long Id { get; set; }
[ValidateNotEmpty]
public string Text { get; set; }
public bool IsFinished { get; set; }
}
```
Previously, we would get a default Swagger UI that enabled all the properties as `Paramters` to populate.
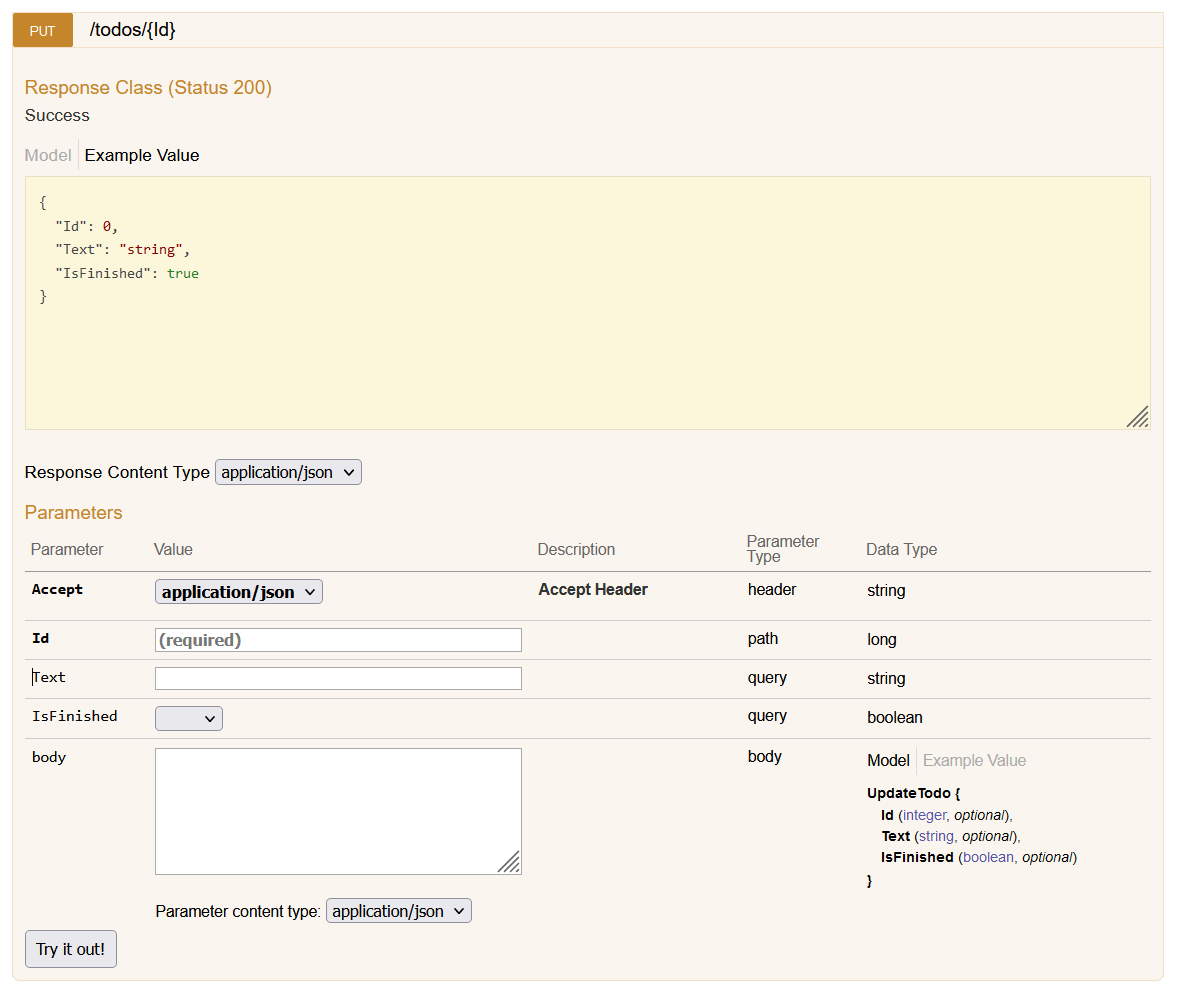
While this correctly describes the Request DTO structure, sometimes as developers we get requirements for how we want to present our APIs to our users from within the Swagger UI.
With the updated SwaggerUI, and the use of the `Swashbuckle` library, we get the following UI by default.
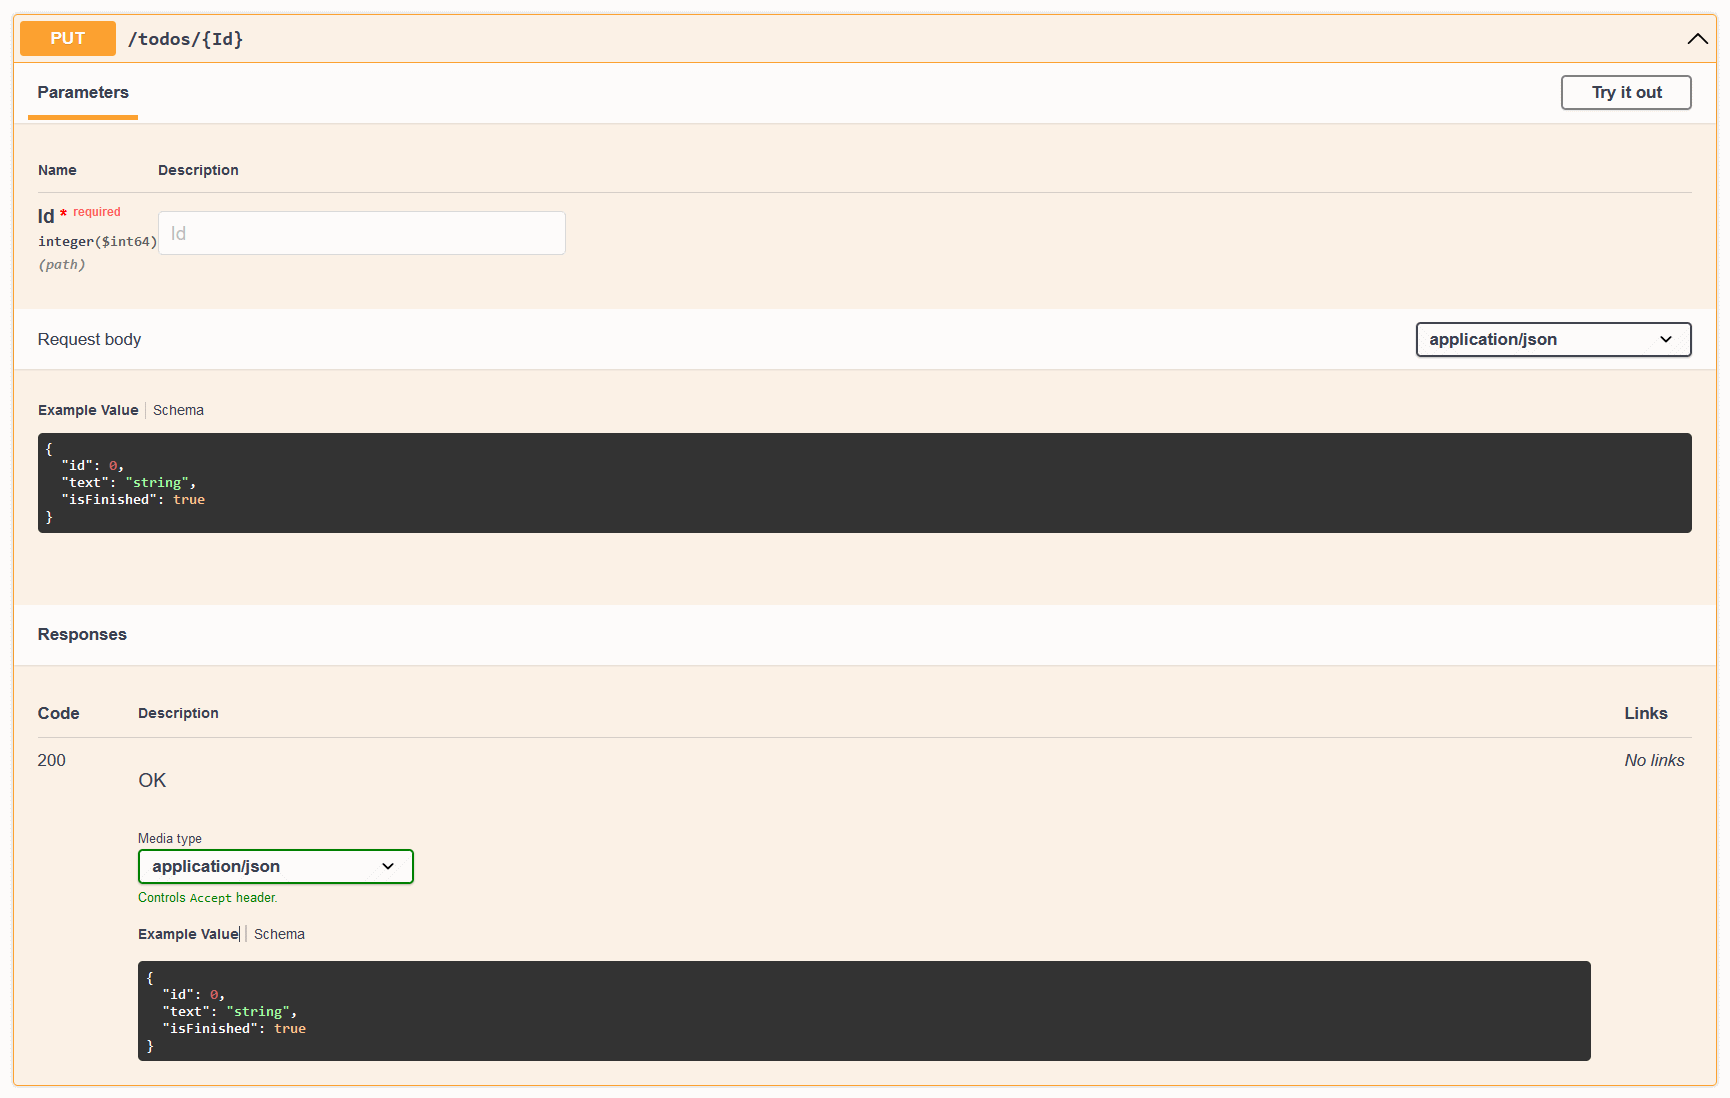
These are essentially the same, we have a CRUD Todo API that takes a `UpdateTodo` Request DTO, and returns a `Todo` Response DTO. ServiceStack needs to have uniquely named Request DTOs, so we can't have a `Todo` schema as the Request DTO despite the fact that it is the same structure as our `Todo` model.
This is a good thing, as it allows us to have a clean API contract, and separation of concerns between our Request DTOs and our models.
However, it might not be desired to present this to our users, since it can be convenient to think about CRUD services as taking the same resource type as the response.
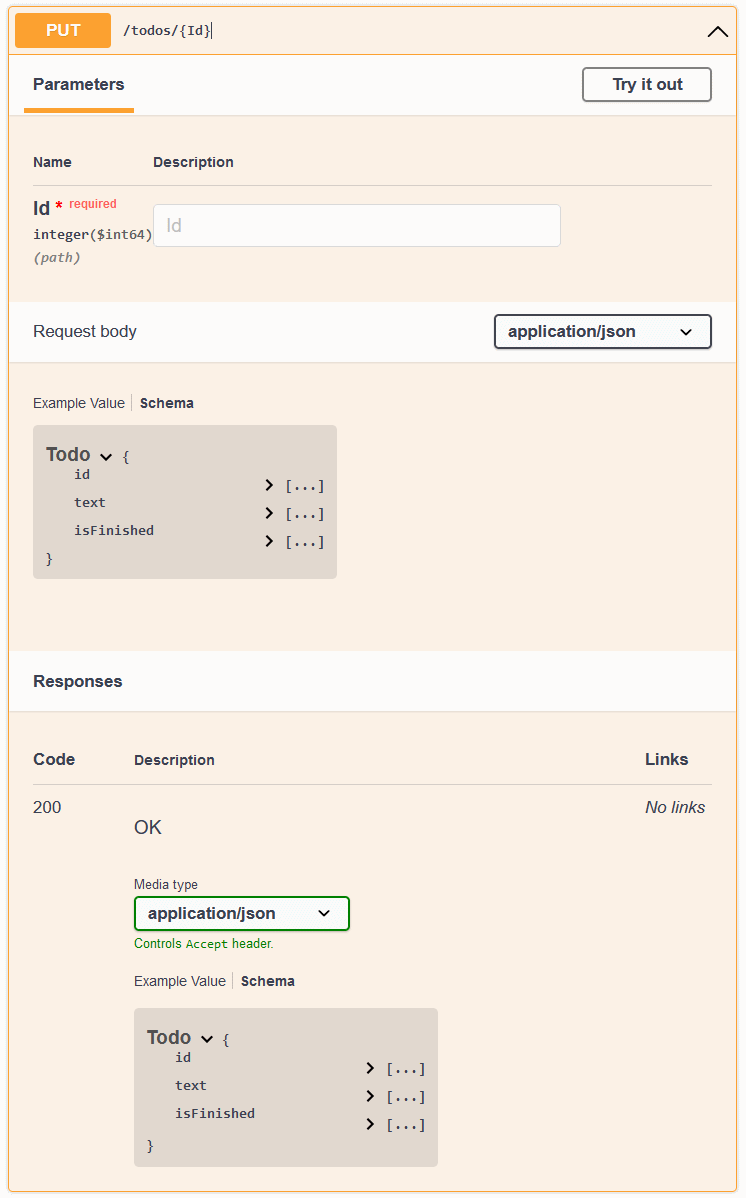
To achieve this, we use the Swashbuckle library to customize the OpenAPI spec generation. Depending on what you want to customize, you can use the `SchemaFilter` or `OperationFilter` options. In this case, we want to customize the matching operation to reference the `Todo` schema for the Request Body.
First, we create a new class that implements the `IOperationFilter` interface.
```csharp
public class OperationRenameFilter : IOperationFilter
{
public void Apply(OpenApiOperation operation, OperationFilterContext context)
{
if (context.ApiDescription.HttpMethod == "PUT" &&
context.ApiDescription.RelativePath == "todos/{Id}")
{
operation.RequestBody.Content["application/json"].Schema.Reference =
new OpenApiReference {
Type = ReferenceType.Schema,
Id = "Todo"
};
}
}
}
```
The above matches some information about the `UpdateTodo` request we want to customize, and then sets the `Reference` property of the `RequestBody` to the `Todo` schema.
We can then add this to the `AddSwaggerGen` options in the `Program.cs` file.
```csharp
builder.Services.AddSwaggerGen(o =>
{
o.OperationFilter();
});
```
The result is the following Swagger UI.
This is just one simple example of how you can customize the OpenAPI spec generation, and `Swashbuckle` has some great documentation on the different ways you can customize the generated spec.
And these customizations impact any of your ASP.NET Core Endpoints, not just your ServiceStack APIs.
## Closing
Now that ServiceStack APIs can be mapped to standard ASP.NET Core Endpoints, it opens up a lot of possibilities for integrating your ServiceStack APIs into the larger ASP.NET Core ecosystem.
The use of the `Swashbuckle` library via the `ServiceStack.AspNetCore.OpenApi` library is just one example of how you can take advantage of this new functionality.
# ServiceStack Endpoint Routing
Source: https://razor-ssg.web-templates.io/posts/servicestack-endpoint-routing
In an effort to reduce friction and improve integration with ASP.NET Core Apps, we've continued the trend from last year
for embracing ASP.NET Core's built-in features and conventions which saw the latest ServiceStack v8 release converting
all its newest .NET 8 templates to adopt [ASP.NET Core Identity Auth](https://docs.servicestack.net/auth/identity-auth).
This is a departure from building upon our own platform-agnostic abstractions which allowed the same ServiceStack code-base
to run on both .NET Core and .NET Framework. Our focus going forward will be to instead adopt De facto standards and conventions
of the latest .NET platform which also means ServiceStack's new value-added features are only available in the latest **.NET 8+** release.
### ServiceStack Middleware
Whilst ServiceStack integrates into ASP.NET Core Apps as custom middleware into ASP.NET Core's HTTP Request Pipeline,
it invokes its own black-box of functionality from there, implemented using its own suite of overlapping features.
Whilst this allows ServiceStack to have full control over how to implement its features, it's not as integrated as it could be,
with there being limits on what ServiceStack Functionality could be reused within external ASP .NET Core MVC Controllers, Razor Pages, etc.
and inhibited the ability to apply application-wide authorization policies across an Application entire surface area,
using and configuring different JSON Serialization implementations.
### Areas for tighter integration
The major areas we've identified that would benefit from tighter integration with ASP.NET Core include:
- [Funq IOC Container](https://docs.servicestack.net/ioc)
- [ServiceStack Routing](https://docs.servicestack.net/routing) and [Request Pipeline](https://docs.servicestack.net/order-of-operations)
- [ServiceStack.Text JSON Serializer](https://docs.servicestack.net/json-format)
### ServiceStack v8.1 is fully integrated!
We're happy to announce the latest release of ServiceStack v8.1 now supports utilizing the optimal ASP.NET Core's
standardized features to reimplement all these key areas - fostering seamless integration and greater reuse which
you can learn about below:
- [ASP.NET Core Identity Auth](https://docs.servicestack.net/auth/identity-auth)
- [ASP.NET Core IOC](https://docs.servicestack.net/releases/v8_01#asp.net-core-ioc)
- [Endpoint Routing](https://docs.servicestack.net/releases/v8_01#endpoint-routing)
- [System.Text.Json APIs](https://docs.servicestack.net/releases/v8_01#system.text.json)
- [Open API v3 and Swagger UI](https://docs.servicestack.net/releases/v8_01#openapi-v3)
- [ASP.NET Core Identity Auth Admin UI](https://docs.servicestack.net/releases/v8_01#asp.net-core-identity-auth-admin-ui)
- [JWT Identity Auth](https://docs.servicestack.net/releases/v8_01#jwt-identity-auth)
Better yet, this new behavior is enabled by default in all of ServiceStack's new ASP .NET Identity Auth .NET 8 templates!
### Migrating to ASP.NET Core Endpoints
To assist ServiceStack users in upgrading their existing projects we've created a migration guide walking through
the steps required to adopt these new defaults:
:::youtube RaDHkk4tfdU
Upgrade your APIs to use ASP.NET Core Endpoints
:::
### ASP .NET Core IOC
The primary limitation of ServiceStack using its own Funq IOC is that any dependencies registered in Funq are not injected
into Razor Pages, Blazor Components, MVC Controllers, etc.
That's why our [Modular Startup](https://docs.servicestack.net/modular-startup) configurations recommend utilizing
custom `IHostingStartup` configurations to register application dependencies in ASP .NET Core's IOC where they can be
injected into both ServiceStack Services and ASP.NET Core's external components, e.g:
```csharp
[assembly: HostingStartup(typeof(MyApp.ConfigureDb))]
namespace MyApp;
public class ConfigureDb : IHostingStartup
{
public void Configure(IWebHostBuilder builder) => builder
.ConfigureServices((context, services) => {
services.AddSingleton(new OrmLiteConnectionFactory(
context.Configuration.GetConnectionString("DefaultConnection"),
SqliteDialect.Provider));
});
}
```
But there were fundamental restrictions on what could be registered in ASP .NET Core's IOC as everything needed to be
registered before AspNetCore's `WebApplication` was built and before ServiceStack's AppHost could be initialized,
which prohibited being able to register any dependencies created by the AppHost including Services, AutoGen Services,
Validators and internal functionality like App Settings, Virtual File System and Caching providers, etc.
## Switch to use ASP .NET Core IOC
To enable ServiceStack to switch to using ASP .NET Core's IOC you'll need to move registration of all dependencies and
Services to before the WebApplication is built by calling the `AddServiceStack()` extension method with the Assemblies
where your ServiceStack Services are located, e.g:
```csharp
builder.Services.AddServiceStack(typeof(MyServices).Assembly);
var app = builder.Build();
//...
app.UseServiceStack(new AppHost());
```
Which now registers all ServiceStack dependencies in ASP .NET Core's IOC, including all ServiceStack Services prior to
the AppHost being initialized which no longer needs to specify the Assemblies where ServiceStack Services are created
and no longer needs to use Funq as all dependencies should now be registered in ASP .NET Core's IOC.
### Registering Dependencies and Plugins
Additionally ASP.NET Core's IOC requirement for all dependencies needing to be registered before the WebApplication is
built means you'll no longer be able to register any dependencies or plugins in ServiceStack's `AppHost.Configure()` method.
```csharp
public class AppHost() : AppHostBase("MyApp"), IHostingStartup
{
public void Configure(IWebHostBuilder builder) => builder
.ConfigureServices(services => {
// Register IOC Dependencies and ServiceStack Plugins
});
public override void Configure()
{
// DO NOT REGISTER ANY PLUGINS OR DEPENDENCIES HERE
}
}
```
Instead anything that needs to register dependencies in ASP.NET Core IOC should now use the `IServiceCollection` extension methods:
- Use `IServiceCollection.Add*` APIs to register dependencies
- Use `IServiceCollection.AddPlugin` API to register ServiceStack Plugins
- Use `IServiceCollection.RegisterService*` APIs to dynamically register ServiceStack Services in external Assemblies
This can be done whenever you have access to `IServiceCollection`, either in `Program.cs`:
```csharp
builder.Services.AddPlugin(new AdminDatabaseFeature());
```
Or in any Modular Startup `IHostingStartup` configuration class, e.g:
```csharp
public class ConfigureDb : IHostingStartup
{
public void Configure(IWebHostBuilder builder) => builder
.ConfigureServices((context, services) => {
services.AddSingleton(new OrmLiteConnectionFactory(
context.Configuration.GetConnectionString("DefaultConnection"),
SqliteDialect.Provider));
// Enable Audit History
services.AddSingleton(c =>
new OrmLiteCrudEvents(c.GetRequiredService()));
// Enable AutoQuery RDBMS APIs
services.AddPlugin(new AutoQueryFeature {
MaxLimit = 1000,
});
// Enable AutoQuery Data APIs
services.AddPlugin(new AutoQueryDataFeature());
// Enable built-in Database Admin UI at /admin-ui/database
services.AddPlugin(new AdminDatabaseFeature());
})
.ConfigureAppHost(appHost => {
appHost.Resolve().InitSchema();
});
}
```
The `ConfigureAppHost()` extension method can continue to be used to execute any startup logic that requires access to
registered dependencies.
### Authoring ServiceStack Plugins
To enable ServiceStack Plugins to support both Funq and ASP .NET Core IOC, any dependencies and Services a plugin needs
should be registered in the `IConfigureServices.Configure(IServiceCollection)` method as seen in the refactored
[ServerEventsFeature.cs](https://github.com/ServiceStack/ServiceStack/blob/main/ServiceStack/src/ServiceStack/ServerEventsFeature.cs)
plugin, e.g:
```csharp
public class ServerEventsFeature : IPlugin, IConfigureServices
{
//...
public void Configure(IServiceCollection services)
{
if (!services.Exists())
{
services.AddSingleton(new MemoryServerEvents
{
IdleTimeout = IdleTimeout,
HouseKeepingInterval = HouseKeepingInterval,
OnSubscribeAsync = OnSubscribeAsync,
OnUnsubscribeAsync = OnUnsubscribeAsync,
OnUpdateAsync = OnUpdateAsync,
NotifyChannelOfSubscriptions = NotifyChannelOfSubscriptions,
Serialize = Serialize,
OnError = OnError,
});
}
if (UnRegisterPath != null)
services.RegisterService(UnRegisterPath);
if (SubscribersPath != null)
services.RegisterService(SubscribersPath);
}
public void Register(IAppHost appHost)
{
//...
}
}
```
#### All Plugins refactored to support ASP .NET Core IOC
All of ServiceStack's Plugins have been refactored to make use of `IConfigureServices` which supports registering in both
Funq and ASP.NET Core's IOC when enabled.
#### Funq IOC implements IServiceCollection and IServiceProvider interfaces
To enable this Funq now implements both `IServiceCollection` and`IServiceProvider` interfaces to enable 100% source-code
compatibility for registering and resolving dependencies with either IOC, which we now recommend using over Funq's
native Registration and Resolution APIs to simplify migration efforts to ASP.NET Core's IOC in future.
## Dependency Injection
The primary difference between the IOC's is that ASP.NET Core's IOC does not support property injection by default,
which will require you to refactor your ServiceStack Services to use constructor injection of dependencies, although
this has become a lot more pleasant with C# 12's [Primary Constructors](https://learn.microsoft.com/en-us/dotnet/csharp/whats-new/tutorials/primary-constructors)
which now requires a lot less boilerplate to define, assign and access dependencies, e.g:
```csharp
public class TechStackServices(IAutoQueryDb autoQuery) : Service
{
public async Task
 ### Authenticating with JWT
JWT Identity Auth is a drop-in replacement for ServiceStack's JWT AuthProvider where Authenticating via Credentials
will convert the Authenticated User into a JWT Bearer Token returned in the **HttpOnly**, **Secure** `ss-tok` Cookie
that will be used to Authenticate the client:
```csharp
var client = new JsonApiClient(BaseUrl);
await client.SendAsync(new Authenticate {
provider = "credentials",
UserName = Username,
Password = Password,
});
var bearerToken = client.GetTokenCookie(); // ss-tok Cookie
```
## JWT Refresh Tokens
Refresh Tokens can be used to allow users to request a new JWT Access Token when the current one expires.
To enable support for JWT Refresh Tokens your `IdentityUser` model should implement the `IRequireRefreshToken` interface
which will be used to store the 64 byte Base64 URL-safe `RefreshToken` and its `RefreshTokenExpiry` in its persisted properties:
```csharp
public class ApplicationUser : IdentityUser, IRequireRefreshToken
{
public string? RefreshToken { get; set; }
public DateTime? RefreshTokenExpiry { get; set; }
}
```
Now after successful authentication, the `RefreshToken` will also be returned in the `ss-reftok` Cookie:
```csharp
var refreshToken = client.GetRefreshTokenCookie(); // ss-reftok Cookie
```
### Transparent Server Auto Refresh of JWT Tokens
To be able to terminate a users access, Users need to revalidate their eligibility to verify they're still allowed access
(e.g. deny Locked out users). This JWT revalidation pattern is implemented using Refresh Tokens which are used to request
revalidation of their access and reissuing a new JWT Access Token which can be used to make authenticated requests until it expires.
As Cookies are used to return Bearer and Refresh Tokens ServiceStack is able to implement the revalidation logic on the
server where it transparently validates Refresh Tokens, and if a User is eligible will reissue a new JWT Token Cookie that
replaces the expired Access Token Cookie.
Thanks to this behavior HTTP Clients will be able to Authenticate with just the Refresh Token, which will transparently
reissue a new JWT Access Token Cookie and then continue to perform the Authenticated Request:
```csharp
var client = new JsonApiClient(BaseUrl);
client.SetRefreshTokenCookie(RefreshToken);
var response = await client.SendAsync(new Secured { ... });
```
There's also opt-in sliding support for extending a User's RefreshToken after usage which allows Users to treat
their Refresh Token like an API Key where it will continue extending whilst they're continuously using it to make API requests,
otherwise expires if they stop. How long to extend the expiry of Refresh Tokens after usage can be configured with:
```csharp
options.JwtAuth(x => {
// How long to extend the expiry of Refresh Tokens after usage (default None)
x.ExtendRefreshTokenExpiryAfterUsage = TimeSpan.FromDays(90);
});
```
## Convert Session to Token Service
Another useful Service that's available is being able to Convert your current Authenticated Session into a Token
with the `ConvertSessionToToken` Service which can be enabled with:
```csharp
options.JwtAuth(x => {
x.IncludeConvertSessionToTokenService = true;
});
```
This can be useful for when you want to Authenticate via an external OAuth Provider that you then want to convert into a stateless
JWT Token by calling the `ConvertSessionToToken` on the client, e.g:
#### .NET Clients
```csharp
await client.SendAsync(new ConvertSessionToToken());
```
#### TypeScript/JavaScript
```ts
fetch('/session-to-token', { method:'POST', credentials:'include' })
```
The default behavior of `ConvertSessionToToken` is to remove the Current Session from the Auth Server which will prevent
access to protected Services using our previously Authenticated Session. If you still want to preserve your existing Session
you can indicate this with:
```csharp
await client.SendAsync(new ConvertSessionToToken {
PreserveSession = true
});
```
### JWT Options
Other configuration options available for Identity JWT Auth include:
```csharp
options.JwtAuth(x => {
// How long should JWT Tokens be valid for. (default 14 days)
x.ExpireTokensIn = TimeSpan.FromDays(14);
// How long should JWT Refresh Tokens be valid for. (default 90 days)
x.ExpireRefreshTokensIn = TimeSpan.FromDays(90);
x.OnTokenCreated = (req, user, claims) => {
// Customize which claims are included in the JWT Token
};
// Whether to invalidate Refresh Tokens on Logout (default true)
x.InvalidateRefreshTokenOnLogout = true;
// How long to extend the expiry of Refresh Tokens after usage (default None)
x.ExtendRefreshTokenExpiryAfterUsage = null;
});
```
# Built-In Identity Auth Admin UI
Source: https://razor-ssg.web-templates.io/posts/identity-auth-admin-ui
With ServiceStack now [deeply integrated into ASP.NET Core Apps](/posts/servicestack-endpoint-routing) we're back to
refocusing on adding value-added features that can benefit all .NET Core Apps.
## Registration
The new Identity Auth Admin UI is an example of this, which can be enabled when registering the `AuthFeature` Plugin:
```csharp
public class ConfigureAuth : IHostingStartup
{
public void Configure(IWebHostBuilder builder) => builder
.ConfigureServices(services => {
services.AddPlugin(new AuthFeature(IdentityAuth.For
### Authenticating with JWT
JWT Identity Auth is a drop-in replacement for ServiceStack's JWT AuthProvider where Authenticating via Credentials
will convert the Authenticated User into a JWT Bearer Token returned in the **HttpOnly**, **Secure** `ss-tok` Cookie
that will be used to Authenticate the client:
```csharp
var client = new JsonApiClient(BaseUrl);
await client.SendAsync(new Authenticate {
provider = "credentials",
UserName = Username,
Password = Password,
});
var bearerToken = client.GetTokenCookie(); // ss-tok Cookie
```
## JWT Refresh Tokens
Refresh Tokens can be used to allow users to request a new JWT Access Token when the current one expires.
To enable support for JWT Refresh Tokens your `IdentityUser` model should implement the `IRequireRefreshToken` interface
which will be used to store the 64 byte Base64 URL-safe `RefreshToken` and its `RefreshTokenExpiry` in its persisted properties:
```csharp
public class ApplicationUser : IdentityUser, IRequireRefreshToken
{
public string? RefreshToken { get; set; }
public DateTime? RefreshTokenExpiry { get; set; }
}
```
Now after successful authentication, the `RefreshToken` will also be returned in the `ss-reftok` Cookie:
```csharp
var refreshToken = client.GetRefreshTokenCookie(); // ss-reftok Cookie
```
### Transparent Server Auto Refresh of JWT Tokens
To be able to terminate a users access, Users need to revalidate their eligibility to verify they're still allowed access
(e.g. deny Locked out users). This JWT revalidation pattern is implemented using Refresh Tokens which are used to request
revalidation of their access and reissuing a new JWT Access Token which can be used to make authenticated requests until it expires.
As Cookies are used to return Bearer and Refresh Tokens ServiceStack is able to implement the revalidation logic on the
server where it transparently validates Refresh Tokens, and if a User is eligible will reissue a new JWT Token Cookie that
replaces the expired Access Token Cookie.
Thanks to this behavior HTTP Clients will be able to Authenticate with just the Refresh Token, which will transparently
reissue a new JWT Access Token Cookie and then continue to perform the Authenticated Request:
```csharp
var client = new JsonApiClient(BaseUrl);
client.SetRefreshTokenCookie(RefreshToken);
var response = await client.SendAsync(new Secured { ... });
```
There's also opt-in sliding support for extending a User's RefreshToken after usage which allows Users to treat
their Refresh Token like an API Key where it will continue extending whilst they're continuously using it to make API requests,
otherwise expires if they stop. How long to extend the expiry of Refresh Tokens after usage can be configured with:
```csharp
options.JwtAuth(x => {
// How long to extend the expiry of Refresh Tokens after usage (default None)
x.ExtendRefreshTokenExpiryAfterUsage = TimeSpan.FromDays(90);
});
```
## Convert Session to Token Service
Another useful Service that's available is being able to Convert your current Authenticated Session into a Token
with the `ConvertSessionToToken` Service which can be enabled with:
```csharp
options.JwtAuth(x => {
x.IncludeConvertSessionToTokenService = true;
});
```
This can be useful for when you want to Authenticate via an external OAuth Provider that you then want to convert into a stateless
JWT Token by calling the `ConvertSessionToToken` on the client, e.g:
#### .NET Clients
```csharp
await client.SendAsync(new ConvertSessionToToken());
```
#### TypeScript/JavaScript
```ts
fetch('/session-to-token', { method:'POST', credentials:'include' })
```
The default behavior of `ConvertSessionToToken` is to remove the Current Session from the Auth Server which will prevent
access to protected Services using our previously Authenticated Session. If you still want to preserve your existing Session
you can indicate this with:
```csharp
await client.SendAsync(new ConvertSessionToToken {
PreserveSession = true
});
```
### JWT Options
Other configuration options available for Identity JWT Auth include:
```csharp
options.JwtAuth(x => {
// How long should JWT Tokens be valid for. (default 14 days)
x.ExpireTokensIn = TimeSpan.FromDays(14);
// How long should JWT Refresh Tokens be valid for. (default 90 days)
x.ExpireRefreshTokensIn = TimeSpan.FromDays(90);
x.OnTokenCreated = (req, user, claims) => {
// Customize which claims are included in the JWT Token
};
// Whether to invalidate Refresh Tokens on Logout (default true)
x.InvalidateRefreshTokenOnLogout = true;
// How long to extend the expiry of Refresh Tokens after usage (default None)
x.ExtendRefreshTokenExpiryAfterUsage = null;
});
```
# Built-In Identity Auth Admin UI
Source: https://razor-ssg.web-templates.io/posts/identity-auth-admin-ui
With ServiceStack now [deeply integrated into ASP.NET Core Apps](/posts/servicestack-endpoint-routing) we're back to
refocusing on adding value-added features that can benefit all .NET Core Apps.
## Registration
The new Identity Auth Admin UI is an example of this, which can be enabled when registering the `AuthFeature` Plugin:
```csharp
public class ConfigureAuth : IHostingStartup
{
public void Configure(IWebHostBuilder builder) => builder
.ConfigureServices(services => {
services.AddPlugin(new AuthFeature(IdentityAuth.For